10 essential tips for Playerunknown's Battlegrounds.

So you’ve played your first few rounds of Playerunknown's Battlegrounds. Maybe you even made it into the top 10 a couple times, but you’re having trouble closing the deal and securing the coveted chicken dinner. Many of the concepts in Playerunknown's Battlegrounds are shared with other battle royale-style games and mods, but if this is your first game of this genre, this guide is for you. The tips in this guide will help the new player understand some techniques and strategies for playing smarter and getting better at the game.
Learn to land and fly, and note the plane’s trajectory
The first thing you do in Playerunknown's Battlegrounds can also be one of the most important decisions you’ll make. If you want to drop somewhere directly in the plane’s trajectory, wait until the plane is almost directly over top of it. If you point your camera straight down, your character will dive to a top speed of 234 kph, and when you hit the automatic chute release zone, you’ll dive deep into it. You’ll spend less time floating down, saving valuable seconds that could be the difference between life and death.
If you want to get in a fight early, there’s no better option than diving into a densely populated area directly under the plane’s flight path. However, if you prefer more of a slow build to the action, it can be a smart strategy to get as far away from the plane as possible. This is where parachute gliding can come in handy. If you pull your chute at a higher altitude, you can travel great distances by swinging your character. Briefly hold W until you reach around 35-40 kph, then let off the key to allow yourself to swing back until it drops to 25-30 kph. This will allow you to stay aloft over much longer distances at the expense of time. It can take much longer to get to the ground, but the distance you can put between you and the majority of players can be well worth it.
Finally, it’s a great move to remember the path that the plane took as you progress through the game. If the plane flies across the eastern border of the map, it’s more likely that the west will be more open. Later in the game, it may be valuable to approach the circle from the west, acting under the assumption that you’ll have fewer enemies to contend with in that region of the map.
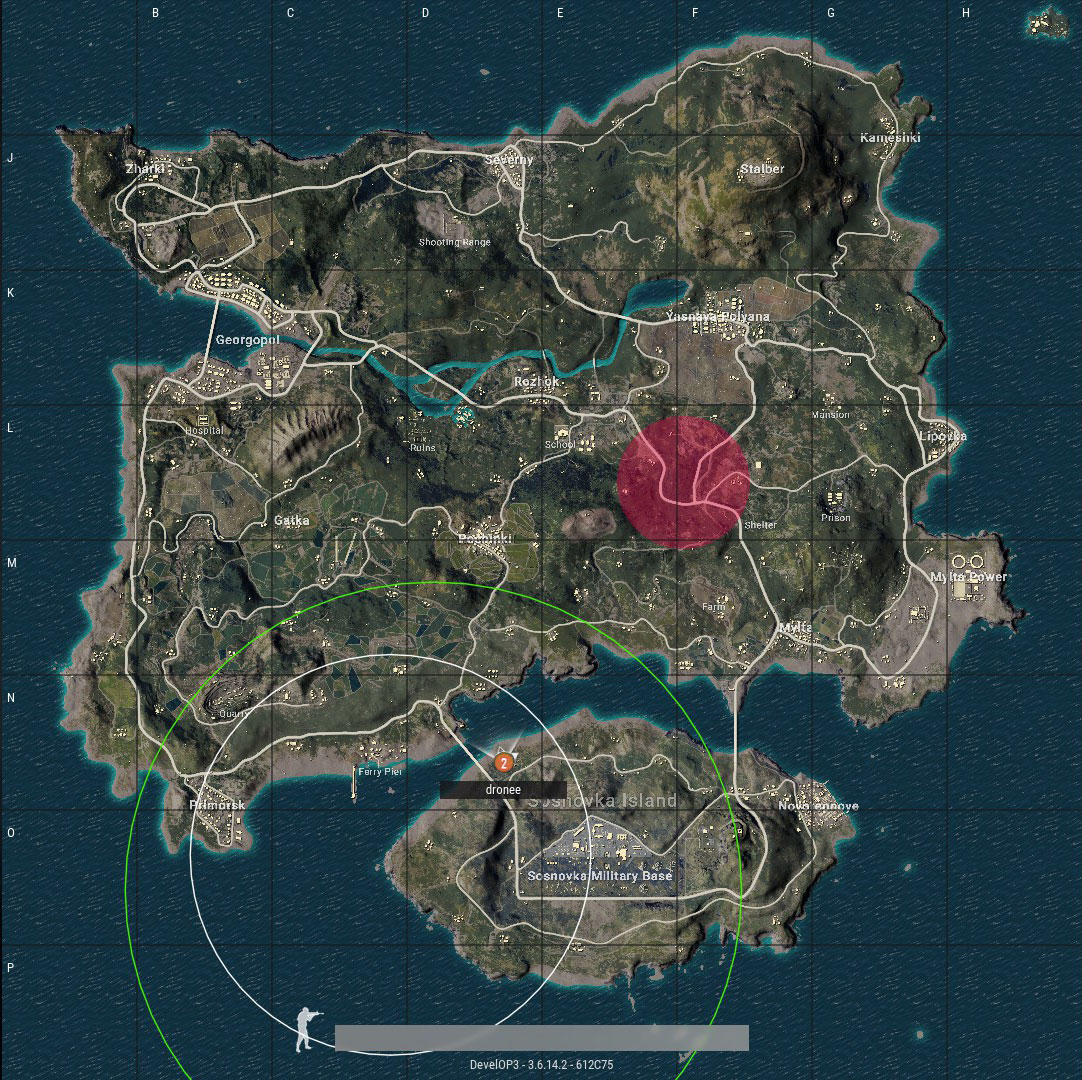
Understand the circles
Nothing drains the fun out of the game more than hoofing it the entire map, trying to reach safety, and dying at the last second to the blue. As soon as you see the first white circle appear, establish a strategy for getting there.
If you’ve landed all the way across the map, this might mean locating a vehicle early. If it’s just a short jaunt, you’ll easily be able to run after the blue circle starts closing in. The initial circle has a huge distance to travel, moves slowly and doesn’t do much damage, but it can throw off your entire game if you don’t have a strategy.
A common strategy is to play near the edge of the blue circle. This reduces the area you need to be aware of, since it’s much less likely that someone is going to sneak up on you from outside the circle, as anyone coming up on you from outside the blue circle is going to be taking playzone damage. If you play this way, be careful to not get caught right up against the blue when it starts coming in.
In cases where the new, smaller white circle is offset from the center of the old one, the blue circle will encroach more slowly on the small side, since the larger side has a lot more distance to close. Use this to your advantage and position yourself in a place where you can outrun the blue circle.
/cdn.vox-cdn.com/uploads/chorus_asset/file/8654171/map.jpg)
The late-game blue circle does considerably more damage than the early ones, so it’s important to scout your next move as soon as you can.
Free look, aim focus and sneak walk
Two extraordinarily powerful tools that aren’t immediately obvious are the ability to free look using the left Alt key, and the ability to focus while aiming down sights with the Shift key.
/cdn.vox-cdn.com/uploads/chorus_asset/file/8658649/PUBG_2.gif)
/cdn.vox-cdn.com/uploads/chorus_asset/file/8658623/PUBG_1.gif)
In third-person view, you can free-look around your character by holding the Alt key and moving your mouse. This allows you to do things like peek around cover and through windows without exposing yourself. It’s great for keeping an eye on the terrain around you while running overland to get to the next circle. Finally, it’s the perfect way to look around for nearby parachutes while you are diving, without throwing off your own trajectory.
While aiming down the sights, you can hold Shift to hold your breath. This steadies your aim and, if you aren’t using an optical attachment with built-in zoom, this will also give you a small amount of zoom. This can make all the difference in trying to land a long-range shot.
One thing to note is that, after you run out of breath from aiming, it’ll take a few seconds to recover, and sprinting will halt the recovery. It’s best to wait a few seconds to let your breath recover before sprinting. If you need to stop and quickly aim, you’ll have full aim capacity.
Footsteps and movement noises are a huge part of Playerunknown's Battlegrounds. If you hold Ctrl while walking, you’ll be able to move much more quietly, albeit slightly slower. This can be good for sneaking around, especially if you know there is someone near you.
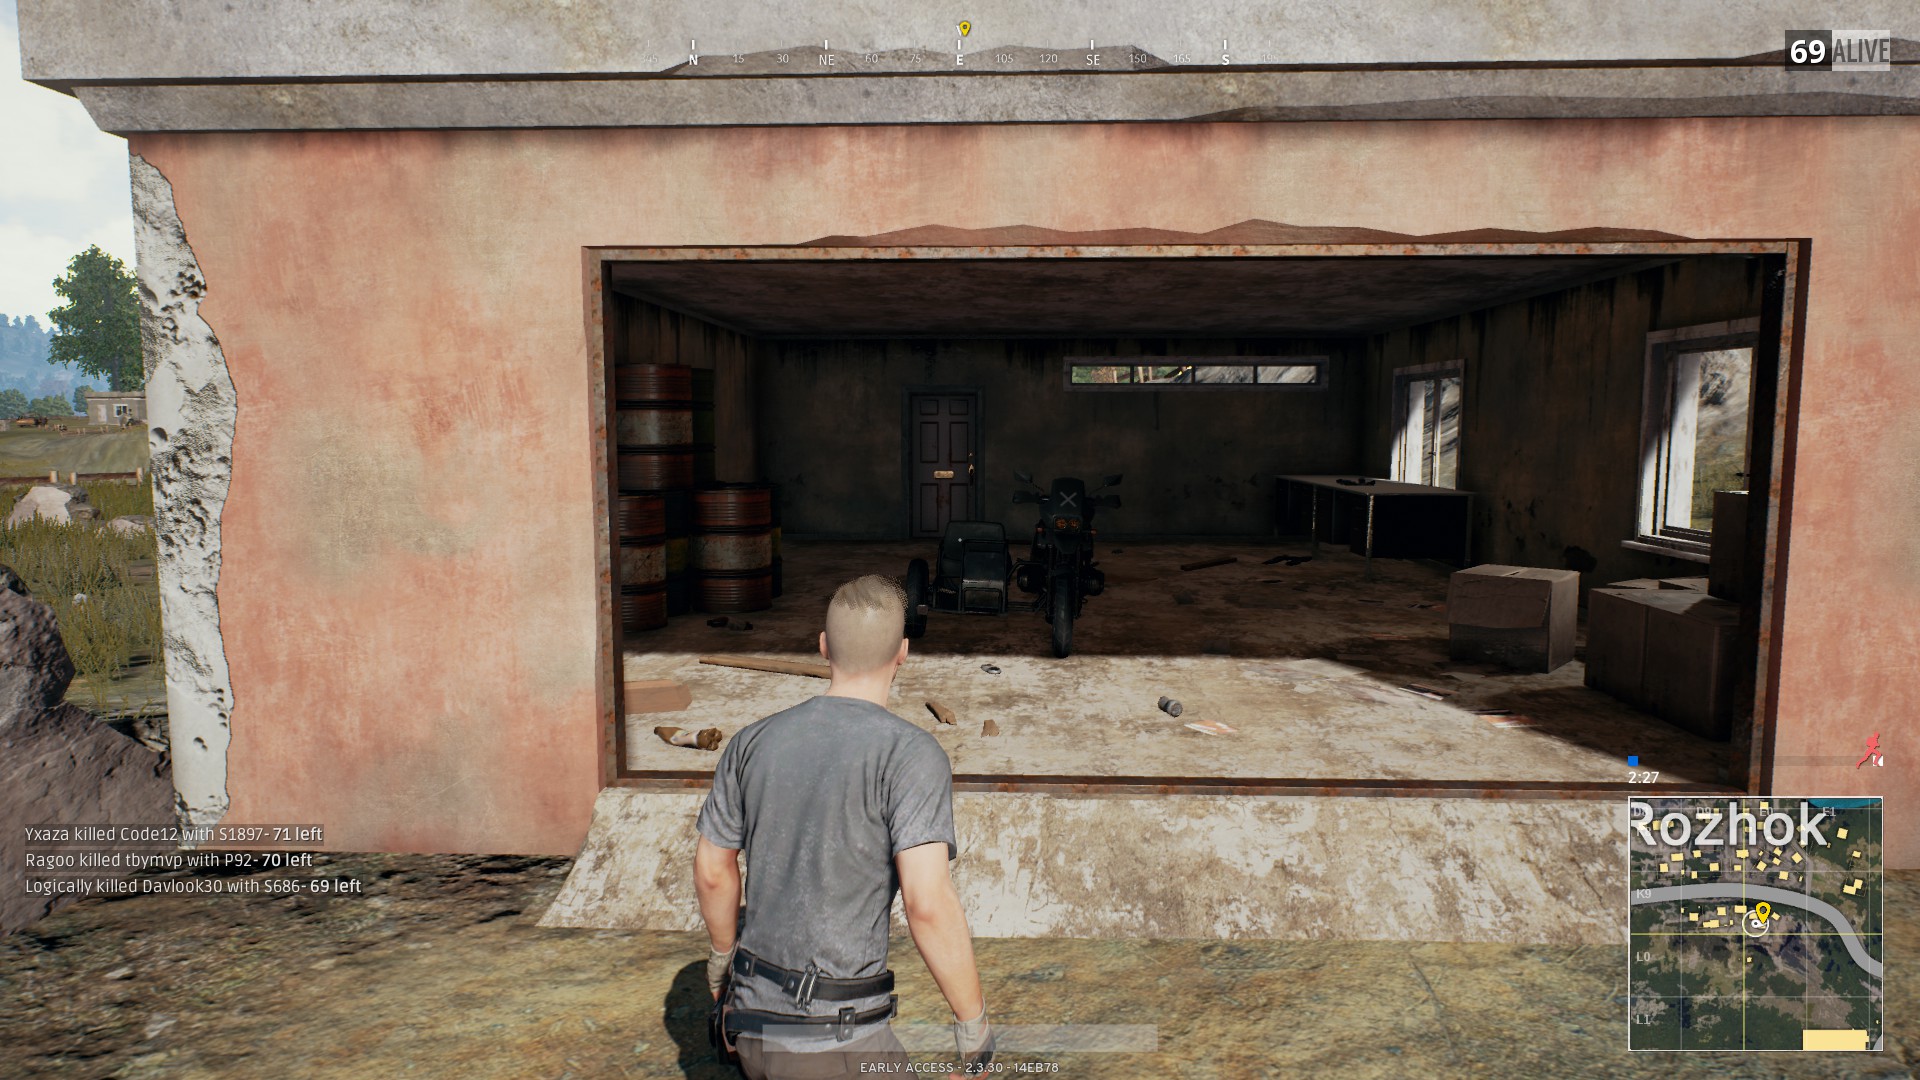
Familiarize yourself with common vehicle locations, and know how to identify spawn vehicles
There are a number of places in Playerunknown's Battlegrounds where there is a very high chance of a vehicle being spawned.
/cdn.vox-cdn.com/uploads/chorus_asset/file/8658877/20170609112540_1.jpg)
In most of the big cities, there is a garage that will often spawn a Dacia or motorcycle. If you check these early (and keep an eye on them as you loot a town), you can proceed with some confidence that you’ll have an escape vehicle if you get stuck with a far circle.
Another important thing to know about vehicles is that, with the exception of garages, they spawn facing due east. This can be a good method to determine if another player has already used a vehicle. You can also park vehicles near a road facing due east to make them appear as though they haven’t been used, and use the vehicle as bait.
Also, if you see a vehicle that isn’t a spawn vehicle and you suspect a player may be nearby, waiting to use that vehicle as their getaway car, shoot out the tires. No sense in making things easy for them.
Know your health kits (and their usage times and keybinds)
Don’t open the menu to use your health kits and boost. The default keybinds are the 7 through 0 keys, but you may want to rebind them to something more convenient (such as G and H). You can save a few seconds and stay more aware of your surroundings by using these keybinds instead of opening up the menu.
Another important thing to remember is the time it takes to use each of the health items. If you’re running for the next white circle and you’re at risk of dying before you reach it, make sure you start your first aid or medkit in time for it to finish before you die.
If you’re caught taking damage from the blue circle later in the game, it’s not worth using bandages. During the cast time, you’ll lose more health than you’ll gain. By the late-game circles, you’ll want to start using a first aid kit almost immediately.
Health kit cast times:
- Medkit: 10 seconds
- First-aid Kit: 7 seconds
- Bandage: 4 seconds
Use boost smartly
Boost items (energy drinks and painkillers) are extremely valuable. Using them fills your boost bar, which refills your health as it ticks down.
With the exception of a full medkit, boost items are the only way to get your health above 75 percent. Additionally, filling your boost meter enough that the third bar is full will give you a run speed boost until the meter ticks out of the third bar.
Combined with the regenerative effects, this makes boost essential when you need to escape a late-game circle. As you get down to the top 15 or so people, if you have enough items, it’s a good strategy to always keep a full boost meter.
Be aware of crate drops (and sometimes go for them)
Occasionally, you’ll hear a plane fly overhead. This plane will deploy cargo drops in the current playable area of the map (anywhere that is not outside the current blue circle). These cargo drops slowly parachute to the ground and then emit a bright red smoke for a few minutes after landing. The crate will regularly have high-end gear such as level 3 armor and backpacks, as well as high-powered guns and zoom scopes.
Because the crates generally carry extremely valuable equipment, they are also a magnet for enemies. Rather than approaching the crate outright, it can often be more fruitful to camp the crate and pick off folks who go after it, or wait until the looter gets away and then take them down. This gives you the opportunity to snag some of the good loot without sticking your neck out. Other times it may just be a good chance to escape an area unnoticed while everyone is preoccupied with the crate.
If you get lucky and the crate comes down near you (or in an area where you’re confident there aren’t many other players), it may make sense to go after it. But you should always be prepared for a fight, and try to get in and out as quickly as possible.
Understand zeroing and bullet drop
/cdn.vox-cdn.com/uploads/chorus_asset/file/8658219/Screen_Shot_2017_06_09_at_10.04.35_AM.png)
Keen-eyed new players will notice the “zeroing distance” meter when aiming down sights. This determines the distance at which your bullet will reach the crosshair in your scope or optics attachment.
The barrel of the gun is below the scope, so if your target is closer than the default zeroing distance of 100 meters, the bullet will actually reach the target lower than the crosshair. In that case, you’ll want to put the crosshair slightly higher than your intended target. However, the difference is minuscule, so it’s something to be aware of, but make sure you’re not overcompensating. The default hotkeys for increasing and decreasing the zeroing distance are Page Up and Page Down.
One especially frustrating thing to be aware of with regard to zeroing is with windowsills, fences and ledges. If you’re right up against a ledge and aiming down the sights, it may look like you’ll be able to shoot clear over it or through the window, but the reality is that your gun barrel is pointed directly at the ledge. There is no bullet penetration on most walls and ledges (with doors being a notable exception), so it’s likely you’ll end up dumping a bunch of shots into an impenetrable barrier.
Know how armor works
Armor is incredibly valuable. With no helmet, there are plenty of weapons that will one-shot you, and a vest drastically reduces the damage you’ll take from chest shots, while also increasing your carrying capacity.
Armor reduces the amount of damage you take, and it gets damaged with each hit. The amount of durability a piece of armor has only determines how much more damage it can take before it breaks. The damage reduction you receive from armor is the same if your vest has 100 durability or 1 durability.
Realistically, a vest only reduces the damage of shots to the chest, and a helmet only reduces the damage of shots to the head. Also, despite the appearance, all helmets have the same area of coverage.
- Level 1 armor (head or vest) offers 30 percent damage reduction
- Level 2 armor (head or vest) offers 40 percent damage reduction
- Level 3 armor (head or vest) offers 55 percent damage reduction
Armor with 1 durability left and a body armor with full durability reduce damage by the same amount. It’ll just break after one hit instead of taking a few hits.
Don’t fear fighting
Especially when you’re new to Playerunknown's Battlegrounds, it can be easy to want to avoid fights while you loot up and wait until you’re absolutely forced to get into a firefight. However, at some point, you’re going to need to learn how to shoot and kill people. As a new player, it’s likely that you’re going to run into folks who are simply more practiced at shooting, and they will outshoot you in a one-on-one battle, leaving you disappointed as you get closer and closer to that chicken dinner.
As you become comfortable with the other aspects of the game, it will be valuable to get in more and more firefights. The game gets a lot more fun as you gain confidence that you can win shootouts, and that confidence will let you be a lot more aggressive when the opportunity presents itself.

/cdn.vox-cdn.com/uploads/chorus_image/image/58508609/pubg_vip_nell_notext.0.jpg)

/cdn.vox-cdn.com/uploads/chorus_image/image/60421601/5e34a78bbd939224930362f73ab0958cc84fa0dc.0.jpg)


